Whether you’re a professional nail artist, a beautician who wants to expand into nail artistry or a beginner who has a passion for exquisite fingertips, it is always useful to know the basics of how to apply rhinestones to nails. There is a myriad of crystal nail art embellishments on the market, so how do you choose the right ones for you? Here’s a handy guide to help choosing the perfect rhinestones for nail art.
Types of embellishment
First let’s look at the different types of embellishment.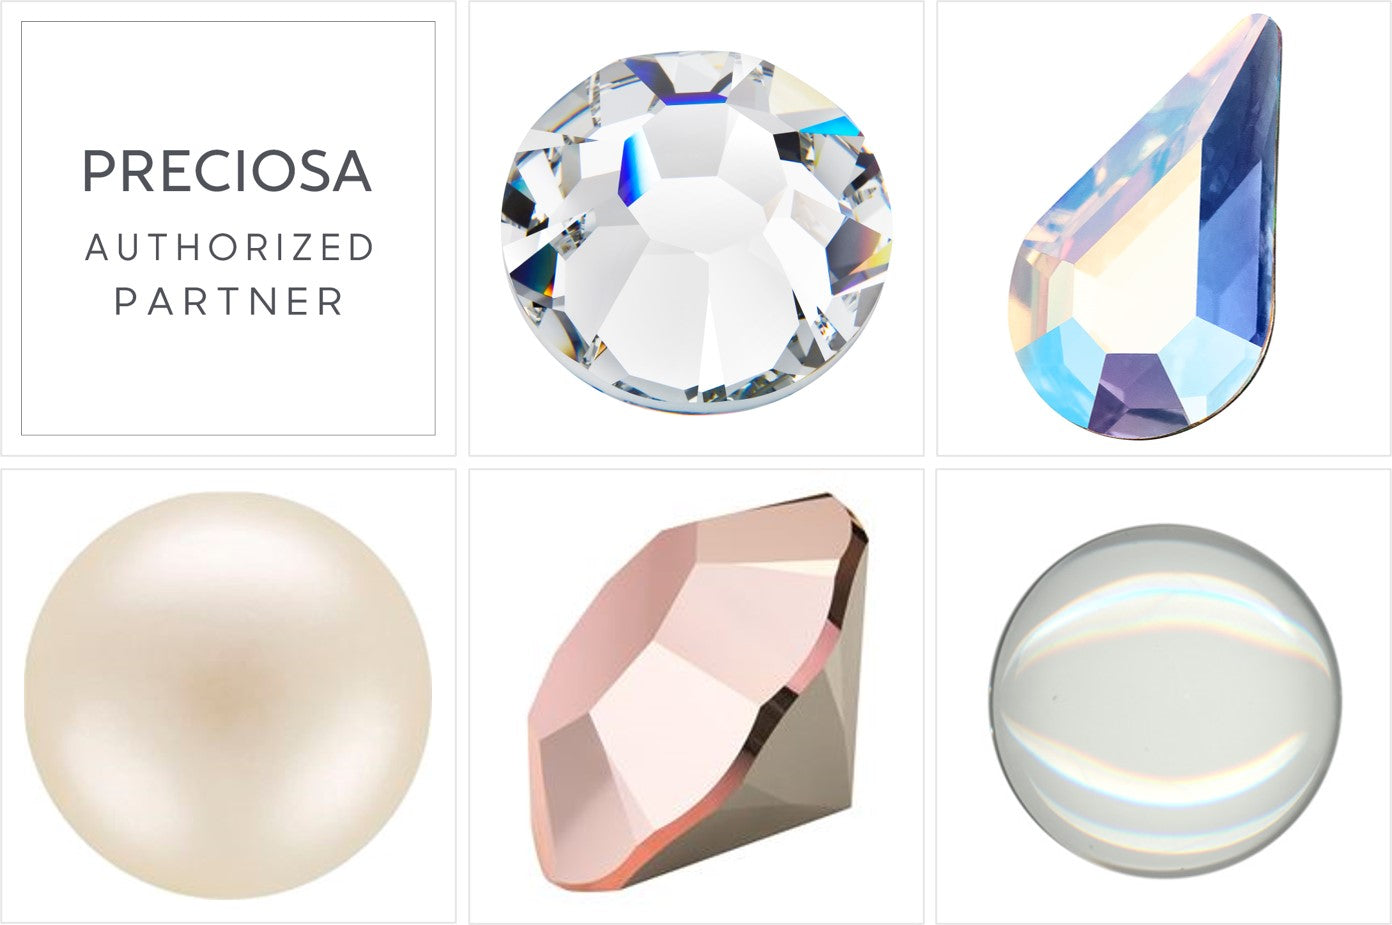
-
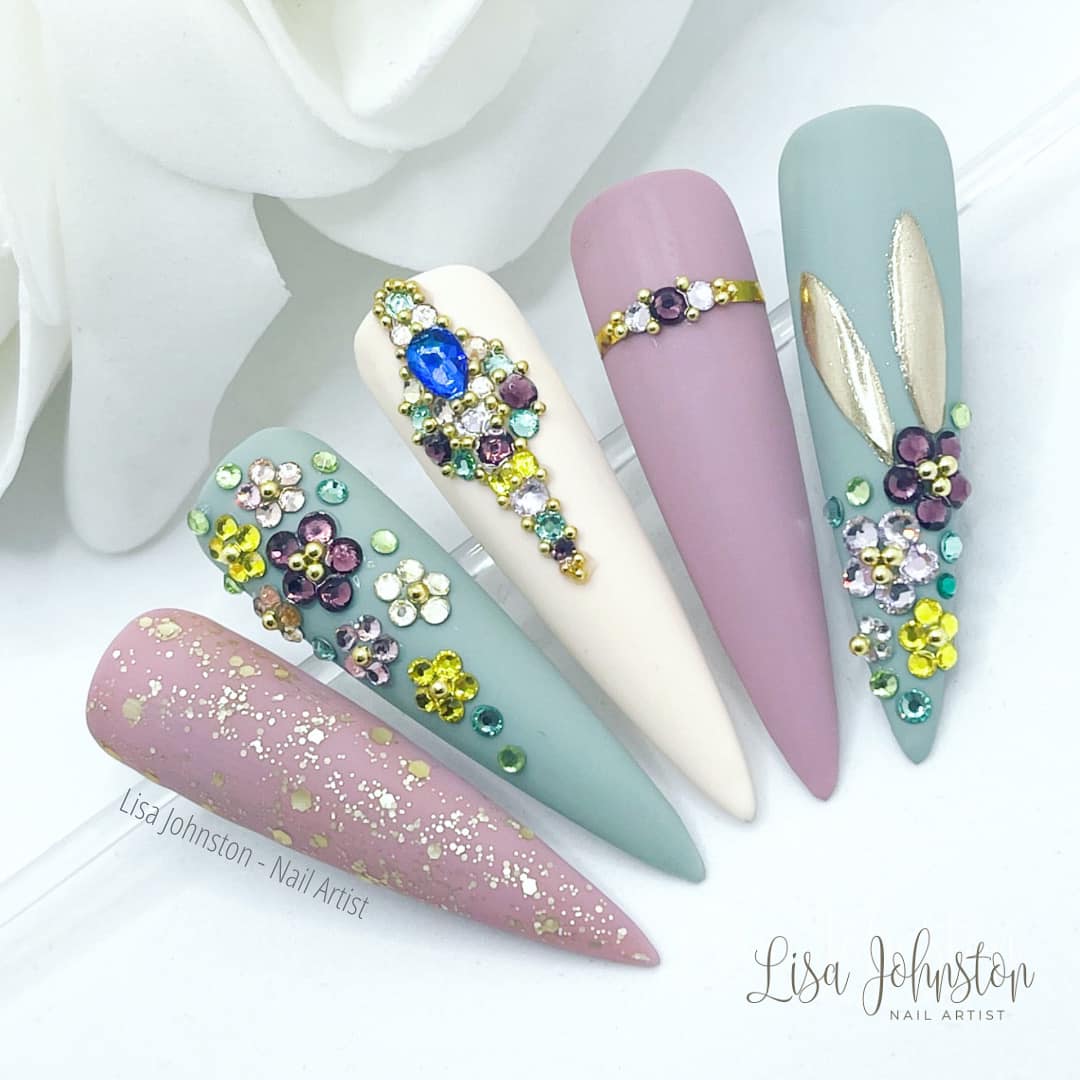
Rhinestones - The most common and by far the most popular is the flatback round rhinestone in non hotfix, also known as glue on, which is a faceted cut glass crystal ranging in size and colour. There are many brands who manufacture non hotfix rhinestones, the high quality brands including Swarovski, Preciosa and Zodiac, all producing rhinestones suitable for nail art. You do also see a lot of cheaper brands producing lower quality gems made from plastic or acrylic, these are cheap and cheerful but don’t offer the same high quality sparkle and durability as the more well known brands. Here, Crystal Parade ambassador Lisa Johnston uses round rhinestones to create this pretty spring floral design.
-
Crystal shapes – A much loved embellishment by most nail artists is the crystal shape. They are a flatback crystal so can be glued on in the same way as a round rhinestone. They range from pretty and intricate shapes such as flower, heart, flame, leaf, butterfly, to simple geometric shapes including rhombus, diamond, square, octagon and triangle. Our best selling shapes are the peardrop and raindrop – nail artists love these! Lisa Johnston uses an individual heart shape to add a delicate touch of sparkle to this set.

-
Pearls – Using flatback pearls within your design adds a more subtle and sophisticated effect. They are particularly popular for bridal nails, vintage style designs and are loved by people who don’t want too much bling. Combining pearls and crystals is a popular technique as they look so beautiful together. Lisa has used tiny flatback pearls and a diamante drop to create the look of a pearl necklace for these wedding nails.

-
Pointy back crystals – A fairly recent trend in the nail art industry is to add 3D pointed back These chunky embellishments lift up the design and are great for creating a statement nail. We recommend you use a thick nail gel glue such as Crystal Fix to apply these, as you need a good strong hold. Here Lisa has used the pointy back crystals in the King’s Crown coronation mix to create a standout design.

-
Cabochons – Preciosa cabochons are a pretty, unfaceted stone, with a smooth domed top. They add a different dimension to the overall look, providing a luxurious sparkle without being too blingy. You can get many different shapes and colours, but the most popular is clear, it gives the effect of a bubble. Bubble nail embellishments are very on trend at the minute, making many appearances on the 2023 catwalks.
 Rhinestone size guide:
The sizes of the rhinestones used in nail art vary from tiny SS2 (1.4mm) to large statement SS20 (5mm) and everything in between. The sizes you want to use really depends on what kind of look you are going for.
-
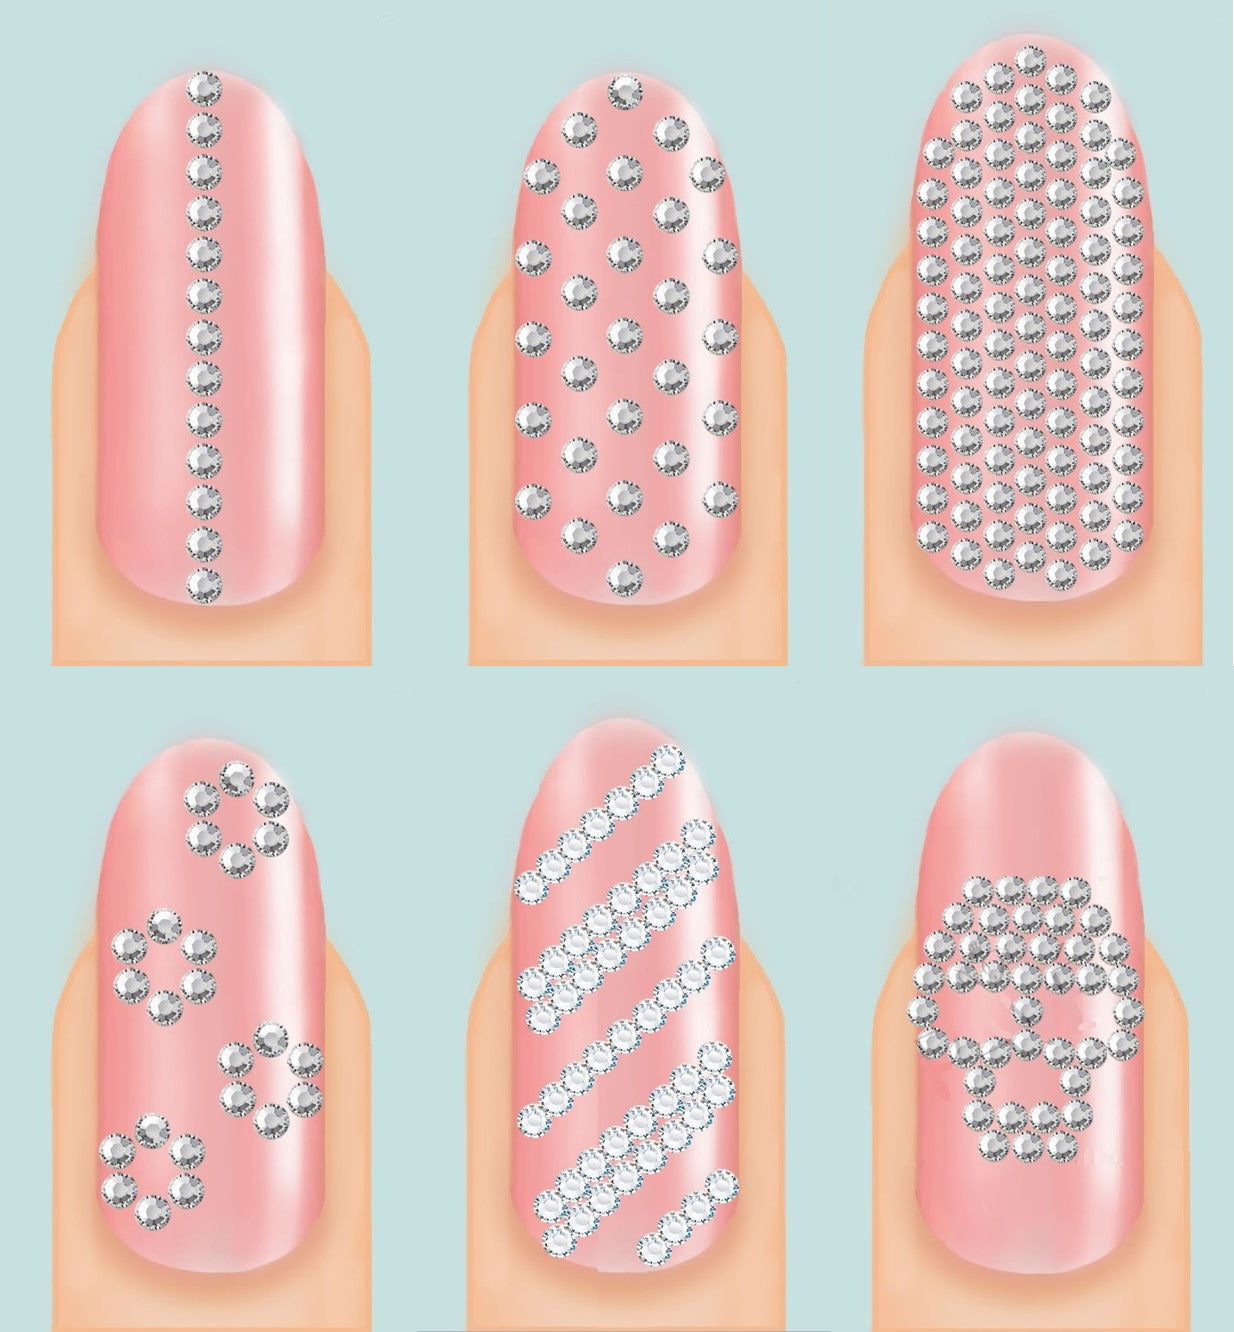
SS2, SS3, SS4, SS5, SS6 (1.4mm – 2mm) – These small sizes are ideal for creating very intricate designs, filling gaps, outlining a design, or depicting an image on the nail. Here Lisa Johnston has used SS6 rhinestones to create lettering – this would be impossible to do with a bigger size.

-
SS7, SS9, SS10 (2.4mm – 3mm) – These medium sized rhinestones are good for scattering over the nail for flashes of sparkle, and they work well with smaller crystals if you are doing a swirl/curved pattern.

-
SS12, SS16, SS20 (3.2mm – 5mm) – These large sizes are only generally used as a one off to create a statement on the nail. Usually, the big chunky stone is the focal point and is often outlined in tiny crystals or caviar beads.

-
Mixed Sizes – A recent nail art trend for those who want lots of sparkle on their manicures, is the ‘rockery effect’. This is where you use all different sizes mixed together to form a full nail of bling. The light from the crystals reflects off each other, giving even more sparkle.
 Here’s a handy guide to the most popular rhinestone sizes, and how they look on the nail:

Rhinestone colour guide
When it comes to choosing the perfect crystal colour for your nail art, the options are vast, and it becomes even more overwhelming when you think of colour combinations too – Mix and match? Contrast or compliment? Bright and bold or neutral and chic? The possibilities are endless!
But Crystal Parade are here to help… with over a decade in the industry, we have the experience and knowledge to advise which colours work together, and we are always keeping up to date with the latest seasonal trends.
Our top selling rhinestone brands Preciosa and Zodiac, produce an amazing array of colours, effects and coatings in their flatback crystal range. Here we will guide you through each of these and how they can be used:

Clear Crystal – This is a colourless, diamond effect stone, with a mirrored foil backing to reflect the light. It is one of our most popular colours for nail art as it adds a luxury feel to whatever you’re crystallizing. Because of their colourless nature, clear crystals will work with every other colour.
AB Crystal – AB (Aurora Borealis) gets its name from the natural phenomenon that occurs in certain skies at night known as the Northern Lights. It is a coated crystal that has a rainbow effect, much like a soap bubble, or sometimes described as an ‘oil on water’ effect. This is the most popular colour by far, especially in the beauty and nail art world, the stunning AB coated crystal reflects light superbly and looks gorgeous in any light. The coating reflects the colours that surround it so use on pale gel colours for pinks, purples, pale blue and golds to shine through. Or use on a darker shade to see greens, yellows and darker shades of blue. Like the Clear crystal, AB crystals work with any other colour so the possibilities are endless.
Standard Colour – Standard colours make up the majority of the range, these are crystals that are just one colour throughout and have no effect or coating over the top. If you’re looking for a simple block colour in a variety of shades, go for one of these. Examples of standard colours are Light Siam (red), Fuchsia (pink), Citrine (yellow), Sapphire (blue) and Peridot (green). These are great for adding a splash of colour to your nail art, and you can choose between bright bold shades, pastel vintage style shades or neutral tones – they really do spoil us for choice!
Special Effects/Coatings - Special effect crystals, also known as rhinestone coatings, are where a thin layer of material has been laid over the top of the crystal, coating it, to create an unusual effect. This could be metallic or two-tone. These special effect crystals often give off more sparkle, looking amazing under the lights. There are two different types of coating: metallic and two-tone.
- Two-tone rhinestones are just that – two (or sometimes three) tones of colour coming through. For example, Preciosa Volcano shines purple, red and blue. Two-tone, sometimes referred to as multi-tone, crystals have the magical quality of appearing to change colour at certain angles. So with movement comes the effect of lots of different colours.
- Metallic rhinestones such as rose gold, aurum (bright gold) and chrome are really on trend at the moment especially in the nail art and beauty industry. The solid metallic finish has a different kind of effect – it shines with bright flashes of light, rather than a twinkle like the standard colours. They are great for steampunk, rocky or edgy designs.
Neon – Neon rhinestones are as bright and bold as the name suggests and some even glow in the dark! Neon crystals are perfect for creating eye catching designs and are a timeless trend for the summer and festival season.
Choosing the right colour for your project
With the huge choice of colours and coatings on offer, it can be hard to decide which colour to choose. Don’t worry if you have no idea where to start when it comes to choosing the perfect colour, here are a few useful tips and ideas to try:
- Look at the Pantone Colour of the Year – this will tell you which colour is on trend each year and may give you a good starting point. For example, the colour of the year for 2023 is ‘Viva Magenta’. Many designers choose to base their designs on the current trending colour.

- Check out what other people in your industry are doing on social media; fashion designers and nail technicians are always keeping on top of the latest trends, so take a look and see what works for you. A big trend in 2023 is chrome nails.

- Take inspiration from your surroundings and interests. Designers often use ideas from nature, the time of year, events in the calendar or travel to create themes and colourways in their work. Seasons are a popular starting point for many people – use pastel and neutral shades in the springtime, bright bold colours in summer, deep warm jewel-tones in Autumn and cool shades of blue, silver and white during the winter. By creating these colourways, you can tell a story or take a journey through your design.

If you need some more tips or inspiration on crystal colours, you can order a handy colour chart to see all the colours, coatings and effects available. Or if you have an idea of colour but would like to see the different shades available, you can speak to one of our team who will happily send free samples.
Rhinestone application techniques
There are endless possibilities when it comes to rhinestone application methods and techniques for nail art. The most important thing to remember is to use good quality tools and adhesives. There’s no point in spending time and effort creating beautiful designs, just for the rhinestones to fall off because you’ve not applied them correctly. Here’s our recommended tools and glue:
- Crystal Katana pick up tool – a professional tool for picking up and placing rhinestones in seconds.
-
Crystal Fix nail glue – the number one glue for bonding rhinestones to nails.
- Sorting tray – a fantastic little tool for keeping your rhinestones shiny side up when working on a set of nails.
- Nail tip holder – A handy tool to have whilst working on a design, or for photographing your creation.
When it comes to design and pattern ideas, that’s something you’ll need to figure out on your own – the trend is always changing and evolving, and there are other factors too; ideas will be based on what mood you’re in, what event you want the nails for, the season, your budget and so on. But you can never go wrong with the basics – popular rhinestone styles are: Lines, scattered, full nail, and recognizable icons such as heart, skull, flowers etc.